概要
Espressif社が提供しているESP32の開発環境ESP-IDFについて理解を深めるべく、Exampleプロジェクトをビルドしてみます。

上記ページを参考にしました。上記ではWindowsネイティブの ESP-IDF をインストールしていますが、ここではWSL上のUbuntuでDockerを用いてビルドします。
作成したプロジェクト
esp-idf_hello_world
これが今回作成したプロジェクトです。
- build
- 01_build-builder.sh
- 02_enter-builder.sh
- 03_build.sh
- Dockerfile
(README等は省略)
ビルド方法
スクリプトの実行方法
READMEの通り、プロジェクトをクローンしたら最上位のディレクトリから、スクリプトがあるディレクトリのパスを含んだ形でスクリプトを実行します。
step1
ビルド用のDockerコンテナのイメージを docker build します。最初の1回のみ実行が必要です。
なおデフォルトのイメージ名は”esp-idf-v5_builder”としており、第一引数で任意の名前を指定可能です。
$ build/01_build-builder.sh
step2
ビルド用のDockerコンテナに入ります。第一引数でイメージ名を指定可能です。
$ build/02_enter-builder.sh
step3
ソースコードをビルドします。 スクリプトの中で ESP-IDF に含まれるサンプルソースコードをコピーしています。
$ build/03_build.sh
解説
Dockerfile
引数指定することでdocker build を実行した環境のユーザ、グループを作成します。
# add user and group
RUN groupadd -g $GROUP_ID $GROUP_NAME
RUN useradd -u $USER_ID -g $GROUP_ID -m $USER_NAME
RUN echo "$USER_NAME:$PASSWORD" | chpasswd
ESP32向けのビルドを行う為 ESP-IDF が必要です。 上記ページの Install Prerequisites, Get ESP-IDF に基づくパッケージのインストールと esp-idf のクローン、”get_idf”エイリアスの設定を行います。
# ESP-IDF Prerequisites
RUN apt install -y git wget flex bison gperf python3 python3-venv cmake ninja-build ccache libffi-dev libssl-dev dfu-util libusb-1.0-0

# Get ESP-IDF
USER ${USER_ID}
RUN mkdir -p ~/esp
RUN git clone --recursive https://github.com/espressif/esp-idf.git ~/esp/esp-idf

# ESP-IDF Set up the tools
RUN ~/esp/esp-idf/install.sh esp32
RUN echo "alias get_idf='. $HOME/esp/esp-idf/export.sh'" > ~/.bash_aliases
01_build-builder.sh
docker buildします。上記の Dockerfile に合わせて引数を指定します。
CMD="docker build . -f $(cd $(dirname $0); pwd)/Dockerfile -t ${IMAGE_NAME} \
            --build-arg USER_NAME=$(id -u -n) \
            --build-arg USER_ID=$(id -u) \
            --build-arg GROUP_NAME=$(id -g -n) \
            --build-arg GROUP_ID=$(id -g) \
            --build-arg PASSWORD=password"
イメージ名を指定可能にしています。
if [ "$#" != 1 ]; then
IMAGE_NAME="esp-idf-v5_builder"
else
IMAGE_NAME=$1
fi
02_enter-builder.sh
Dockerコンテナに入った後、 “get_idf” を実行すればビルドを短縮できるメッセージを表示します。
03_build.sh
“get_idf” に相当する処理を最初に実行し、$IDF_PATH/examples/get-started/hello_world からソースコードをコピーしています。 idf.py でビルドします。
if [ -z "$IDF_PATH" ]; then
. $HOME/esp/esp-idf/export.sh
fi

if [ ! -d "hello_world" ]; then
cp -R $IDF_PATH/examples/get-started/hello_world ./
fi

cd hello_world

idf.py set-target esp32
idf.py build
FlashROMへの書き込み
ビルドするとFlashROMへの書き込みコマンドが表示されます。
Project build complete. To flash, run:
 idf.py flash
or
 idf.py -p PORT flash
or
 python -m esptool --chip esp32 -b 460800 --before default_reset --after hard_reset write_flash --flash_mode dio --flash_size 2MB --flash_freq 40m 0x1000 build/bootloader/bootloader.bin 0x8000 build/partition_table/partition-table.bin 0x10000 build/hello_world.bin
or from the "/home/wurly/work/hello_world/build" directory
 python -m esptool --chip esp32 -b 460800 --before default_reset --after hard_reset write_flash @flash_args
usbipd-win などを使えば、WSL環境からもUSBデバイスが使用できるのですが、ここでは下記のようにバイナリファイルをWindowsファイルシステム上にコピーし、 ESP32 FlashROM 書き込み の方法で書き込みを行いました。
copy \\wsl.localhost\Ubuntu-22.04\home\wurly\project\esp-idf_hello_world\hello_world\build\bootloader\bootloader.bin .\
copy \\wsl.localhost\Ubuntu-22.04\home\wurly\project\esp-idf_hello_world\hello_world\build\partition_table\partition-table.bin .\
copy \\wsl.localhost\Ubuntu-22.04\home\wurly\project\esp-idf_hello_world\hello_world\build\hello_world.bin .\

esptool.py --chip esp32 --port COM3 --baud 921600 write_flash 0x1000 bootloader.bin 0x8000 partition-table.bin 0x10000 hello_world.bin
実行結果
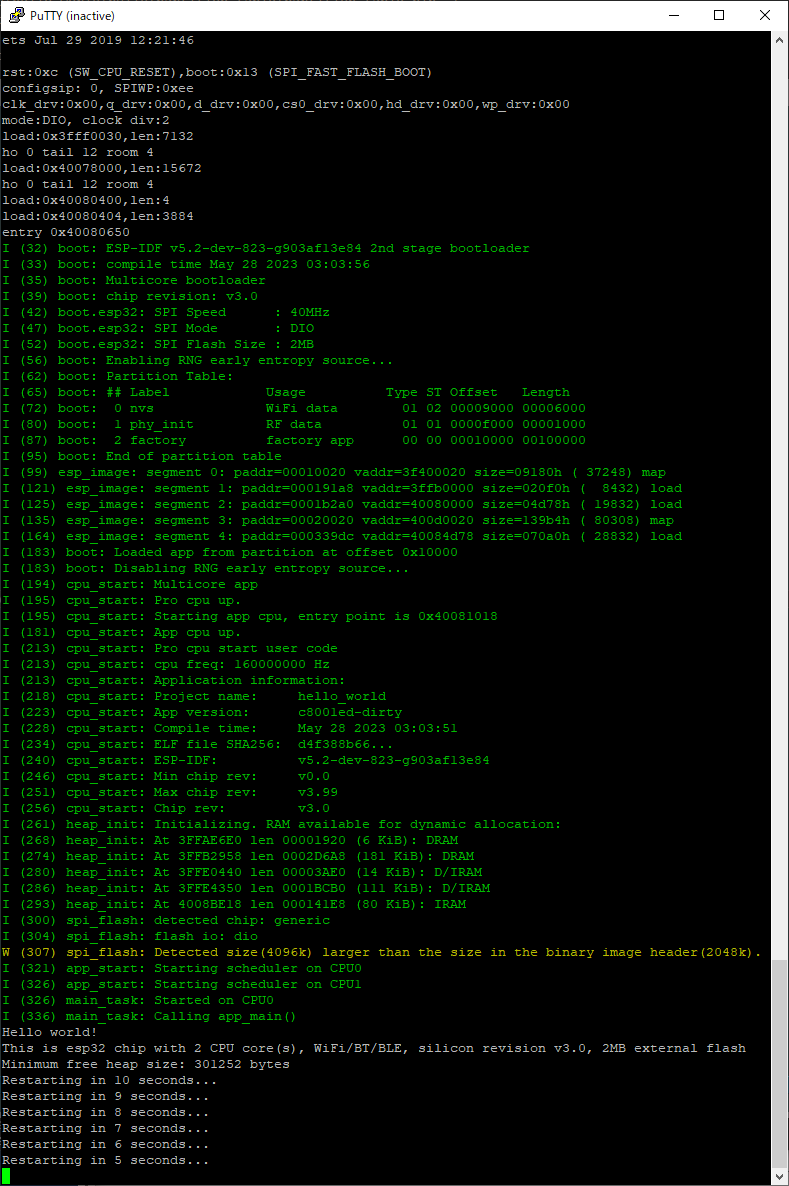
helloアプリケーションが実行できました。


